

How To Turn On Vt In Windows 10
Hardware Virtualization, likewise called Platform, Server virtualization is the virtualization of computers as consummate hardware platforms. In this post, we will testify yous how to enable or disable Hardware Virtualization in Windows 11/10, via the BIOS settings.
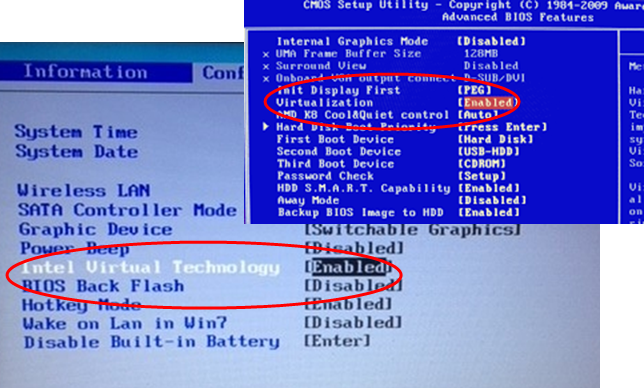
Disable or Enable Hardware Virtualization in Windows 11/10
While almost recent PCs support hardware virtualization, not all reckoner vendors enable this feature as shipped from the manufactory. The setting may be chosenVT-ten,AMD-V,SVM, Vanderpool, Intel VT-d orAMD IOMMU if the options are bachelor.
If y'all are unable to find the Virtualization settings in your BIOS it may mean that your PC does not support information technology. Nevertheless, you lot can bank check if your Windows 10 PC supports HAV.
If your computer doesn't offer any options to access its BIOS earlier your Bone loads then it is possible that it uses UEFI instead. On a UEFI-based figurer, there is often no button press prompt before the Os loads. Instead, yous will access these settings from inside the OS.
For a Windows system; hold downward the Shift key every bit you click Restart in Windows to reboot straight to that menu. To access the UEFI Firmware Settings, click the Troubleshoot tile, select Advanced Options, and select UEFI Firmware Settings. Click the Restart option subsequently and your computer will reboot into its UEFI firmware settings screen.
Different MOBOs use different BIOS configurations – so to enable or disable Hardware Assisted Virtualization (HAV) on your Windows x device, you can see the sections beneath for a list of the nigh common computer manufacturers and information regarding accessing the BIOS settings for each PC manufacturer.
Acer
Most commonly: F2 or Delete.
On older computers: F1 or the key combination CTRL+ALT+ESC.
- PloughON the Organization.
- PressF2 key at startup BIOS Setup.
- Printing the right arrow fundamental toArrangement Configuration tab, SelectVirtualization Engineering science and and so press theEnter key.
- SelectEnabled and press theEnter key.
- Printing theF10 fundamental and selectYes and press theEnter primal to save changes andRebootinto Windows.
Asus
Nearly commonly: F2.
Alternatively: Delete or Insert fundamental, and less ordinarily F10.
- PlowON the System.
- PrintingF2 key at startup BIOS Setup.
- Printing the right pointer key toAdvancedtab, SelectVirtualization Applied science and so printing theEnter cardinal.
- SelectEnabled and press theEnter cardinal.
- Press theF10 key and selectYes and press theEnter primal to save changes andRebootinto Windows.
DELL
Newer models: F2 key whilst Dell logo is on screen.
Alternatively: F1, Delete, F12, or F3.
Older models: CTRL+ALT+ENTER or Delete or Fn+ESC or Fn+F1.
- TurnON the Organisation.
- PrintingF2 key at startup BIOS Setup.
- Press the correct arrow cardinal toAdvanced tab, SelectVirtualization and and then press theEnter key.
- SelectEnabled and press theEnter key.
- Press theF10 key and selectAye and printing theEnter key to save changes andRebootinto Windows.
HP

Most commonly: F10 or ESC.
Alternatively: F1, F2, F6, or F11
On HP Tablet PCs: F10or F12
- Turn ON the Organisation
- Repeatedly pressEsc primal at startup.
- Press theF10 central for BIOS Setup.
- Printing the right arrow fundamental toOrganization Configuration tab, SelectVirtualization Technology and then printing theEnterkey.
- SelectEnabled and printing theEnter fundamental.
- Press theF10 key and selectYep and printing theEnter primal to save changes andReboot.
Lenovo
Most usually: F1 or F2
Older hardware: the key combination CTRL+ALT+F3 or CTRL+ALT+INS or Fn+F1.
Enabling VT-x in ThinkPad (Tablets/Convertibles/Notebooks):
- PowerON the system.
- PressEnter or Tap the affect screen duringLenovostartup screen.
- Press or TapF1 to enter into BIOS Setup.
- Navigate toSecurity tab, then press Enter onVirtualization.
- Select Intel(R) Virtualization Technology, PressEnter,choose Enableand press Enter.
- PressF10 .
- Press Enter onYES to salvage the settings and kicking into Windows.
Enabling VT-x in ThinkCentre (Desktops):
- PowerON the organisation.
- PrintingEnterduringLenovostartup screen.
- PressF1 key to enter into BIOS Setup.
- Navigate to theAdvanced tab and press Enter onCPU Setup.
- Select Intel(R) Virtualization Engineering, Printing Enter,choose Enableand press Enter.
- PressF10.
- Press Enter onYES to save the settings and boot into Windows.
Sony
Sony VAIO: F2 or F3
Alternatively: F1
If your VAIO has an ASSIST key, endeavour to printing and agree it while you lot power on the laptop. This also works if your Sony VAIO came with Windows eight.
- With the computer turned completely off, press and hold theAid button until the black VAIO screen appears.
Notation: The location of theAid push will be unlike depending on the calculator model. Refer to the operating instructions supplied with the estimator for the exact location of theAid push on your model.
- At theVAIOCare | Rescue Style screen, printing theDown Arrow cardinal until theShowtime BIOS setup [F2] choice is highlighted, and then press theEnter cardinal.
- In the[BIOS Name] Setup Utility screen, press the right-arrow key until theAvant-garde tab is selected.
- On theAdvanced tab, press the downwardly-arrow primal untilIntel(R) Virtualization Applied science is selected so press theEnter key.
- Use the arrow keys to selectEnabled, and so press theEnter key.
- Press the right-pointer cardinal until theGo out tab is selected.
- Press the down-pointer key untilExit Setup is selected then press theEnter key.
- In theSave screen, verifyYep is selected and then press theEnter key.
Toshiba
Near commonly: F2 fundamental.
Alternatively: F1 and ESC.
Toshiba Equium: F12
- TurnON the Organisation.
- PressF2 key at startup BIOS Setup.
- Press the right arrow key toAvant-gardetab, SelectVirtualization Technology and then press theEnter key.
- SelectEnabled and press theEnter key.
- Printing theF10 key and selectYes and printing theEnter key to save changes andRebootinto Windows.
Hope you discover this post informative enough!
Read next:
- Virtualization support is disabled in the firmware
- How to enable TPM in Hyper-V to install Windows eleven.
- Find if your computer supports Intel VT-X or AMD-5.
Source: https://www.thewindowsclub.com/disable-hardware-virtualization-in-windows-10
Posted by: medinapealis.blogspot.com
0 Response to "How To Turn On Vt In Windows 10"
Post a Comment